Girth is the distance all the way around the thickest point — the same thing as circumference. Measuring it takes five minutes and needs at most a piece of string, and it turns every size chart on the internet from vague to legible, because you finally have one number whose feel you can vouch for. This is the guide to doing it well.
If the vocabulary is new, the girth explainer covers it. This page is the hands-on part.
Method one: the soft tape
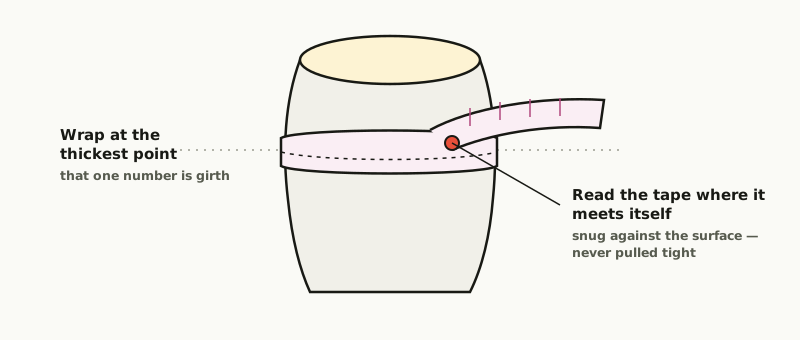
The gold standard is a flexible sewing tape — the soft ribbon kind from a sewing kit or supermarket. A rigid metal builder’s tape can’t follow a curve and will lie to you.
- Find the thickest point. Run your fingers along the shaft; on most sculpts it’s obvious. On a knotted or textured piece there may be several candidates. Measure each; the biggest insertable one is the headline girth.
- Wrap once, flat and level. The tape should sit in full contact all the way round, not spiralling and not bridging across a dip.
- Snug, never tight. The tape should touch everywhere without denting the surface. This is the step that ruins most measurements: on soft silicone, an enthusiastic pull visibly squashes the toy and can shave a genuine quarter-inch off the reading.
- Read where the tape meets itself, at the zero mark.
- Measure twice. Unwrap, re-wrap, read again. If the two readings disagree by more than a couple of millimetres, the tape was tight or crooked. Go again.
No tape? The string method
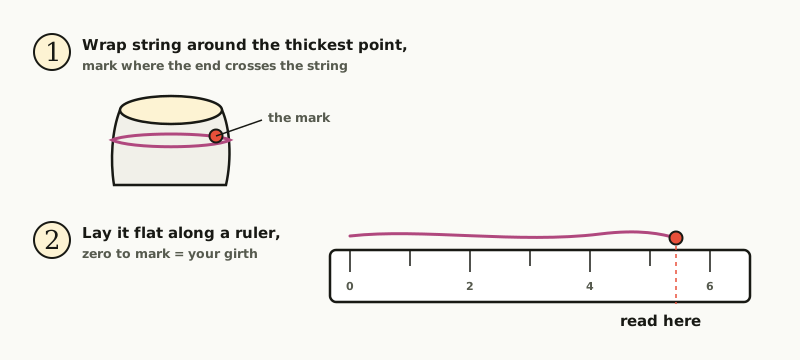
The string method is exactly as accurate if you’re careful, and everyone owns the equipment. Use anything flexible but non-stretchy: string, ribbon, a shoelace, a phone cable, or a strip of paper (paper is excellent, because it can’t stretch).
- Wrap it once around the thickest point, same rules as the tape: flat, level, snug not tight.
- Mark the exact spot where the running end crosses the standing part — pen dot, fingernail pinch, or a fold if it’s paper.
- Lay it flat along an ordinary ruler and read from the end to the mark.
The one failure mode is stretch. Elastic cord or a wool thread pulled taut will happily add optimism to the number, which you’ll pay back later in comfort. When in doubt, paper strip.
Where exactly do you measure on a toy?
Fantasy sculpts aren’t cylinders — that’s rather the point of them. A single “girth” number flattens a shape that might swing from 4.5″ at the tip to 8″ at the knot. This is why makers, and our database, spec girth at named measuring points:
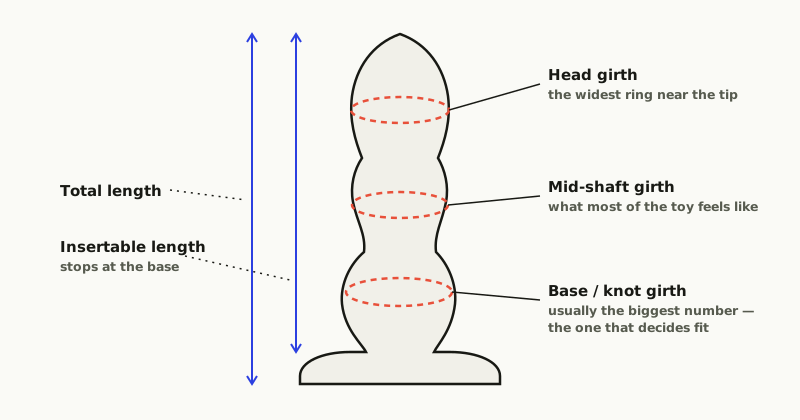
- Head girth — the widest ring near the tip; what arrives first.
- Mid-shaft girth — what most of the toy feels like in use.
- Base or knot girth — usually the largest number, and the one that decides whether the whole toy works for you. When a product card on this site shows a single girth, it’s this: the widest insertable point.
- Total vs insertable length — end-to-end versus tip-to-base-flare. Only insertable length tells you about depth; harness and suction bases can add a lot of decorative total.
When you measure your own toys, note the point next to each number (“mid-shaft: 5.2″”). Future you, comparing against a spec table, will be grateful.
Measuring yourself (or a partner)
Same physics, same methods, no photographs required. A few specifics:
- Measure when fully erect, around the thickest point of the shaft. That’s the state a toy has to match.
- The string method works fine; so does the sewing tape. Snug, not tight, exactly as above.
- Take it more than once, on more than one occasion. Bodies vary day to day, so average the readings — the best-ever number isn’t the one a toy has to live up to.
- Nobody is grading this. The number is an engineering input, and girth is the dimension that predicts comfort.
The five ways a measurement goes wrong
Most bad numbers trace back to one of these habits. Worth a skim before you trust a measurement, yours or anyone else’s.
- Pulling tight. The champion error. A snug wrap and a tight wrap can differ by a quarter-inch on soft silicone, and always in the flattering direction.
- Measuring on the diagonal. A tape that spirals even slightly reads long. The wrap should sit in one plane, square to the shaft.
- Using something stretchy. Elastic, wool, a hair tie: all generous liars. Paper strip or proper tape.
- Reading the wrong point. “It’s 5 inches” — at the tip, mid-shaft, or the knot? A number without its point is half a fact. Say where.
- Confusing around with across. A “2-inch toy” might be 2″ across (a substantial 6.3″ girth) or 2″ around (a pencil). If a listing’s number seems bizarre, it’s usually this. The converter settles it in seconds.
From number to decision
A girth measurement is a key that unlocks the practical tools:
- Convert it — the girth ↔ diameter converter turns your tape number into a diameter, in any unit, and draws the circle life-size against a bank card for a reality check.
- Anchor it — a toy you’ve measured and know the feel of is the best possible starting point for the fit engine, which ranks every size we track by closeness to your numbers.
- Browse with it — the shelf filters by girth band: 4–5″, 5–6″, 6–7″, or sorted slender-first if you’d rather ease in.
- Sizing up? Do it gradually. The beginner sizing guide covers how big a jump between toys is sensible, and why firmness changes the answer.
One caveat on the derived numbers. When a spec on this site shows ~ next to a diameter, that number came from the measured circumference via π, and real toys are slightly oval, so treat it as close rather than exact. The girth you measured with your own string, though? That one’s real.